The Best Fluffy Pancakes recipe you will fall in love with. Full of tips and tricks to help you make the best pancakes.
The helix piercing is one of those things that looks effortless on everyone else and feels like a major decision when you’re the one considering it.
Part of that is the permanence – cartilage piercings are a longer commitment than lobes. Part of it is the options. There isn’t just one kind of helix piercing. There’s a whole geography of placements, styles, and stacking combinations that can take a simple ear from one piercing to a full curated look. Knowing the difference before you walk in makes the whole thing easier.
Here’s the complete picture.
What a Helix Piercing Actually Is
The helix is the curved outer rim of your ear – the cartilage that runs along the top and outer edge, from just above the lobe up to where it curls in toward the top of your head. A helix piercing goes through this cartilage anywhere along that ridge.
It is not the same as a lobe piercing. Cartilage is denser tissue with a different blood supply, which means it behaves differently during the piercing process, heals differently, and requires more patience afterward. That’s not a reason not to get it – it’s just the reality worth knowing upfront.
The name itself comes from the anatomical term for that part of the ear. Some people also associate it with the DNA double helix shape, noting that a row of helix piercings can echo that spiral geometry. Whether or not that’s the origin of the name, it’s a useful visual.
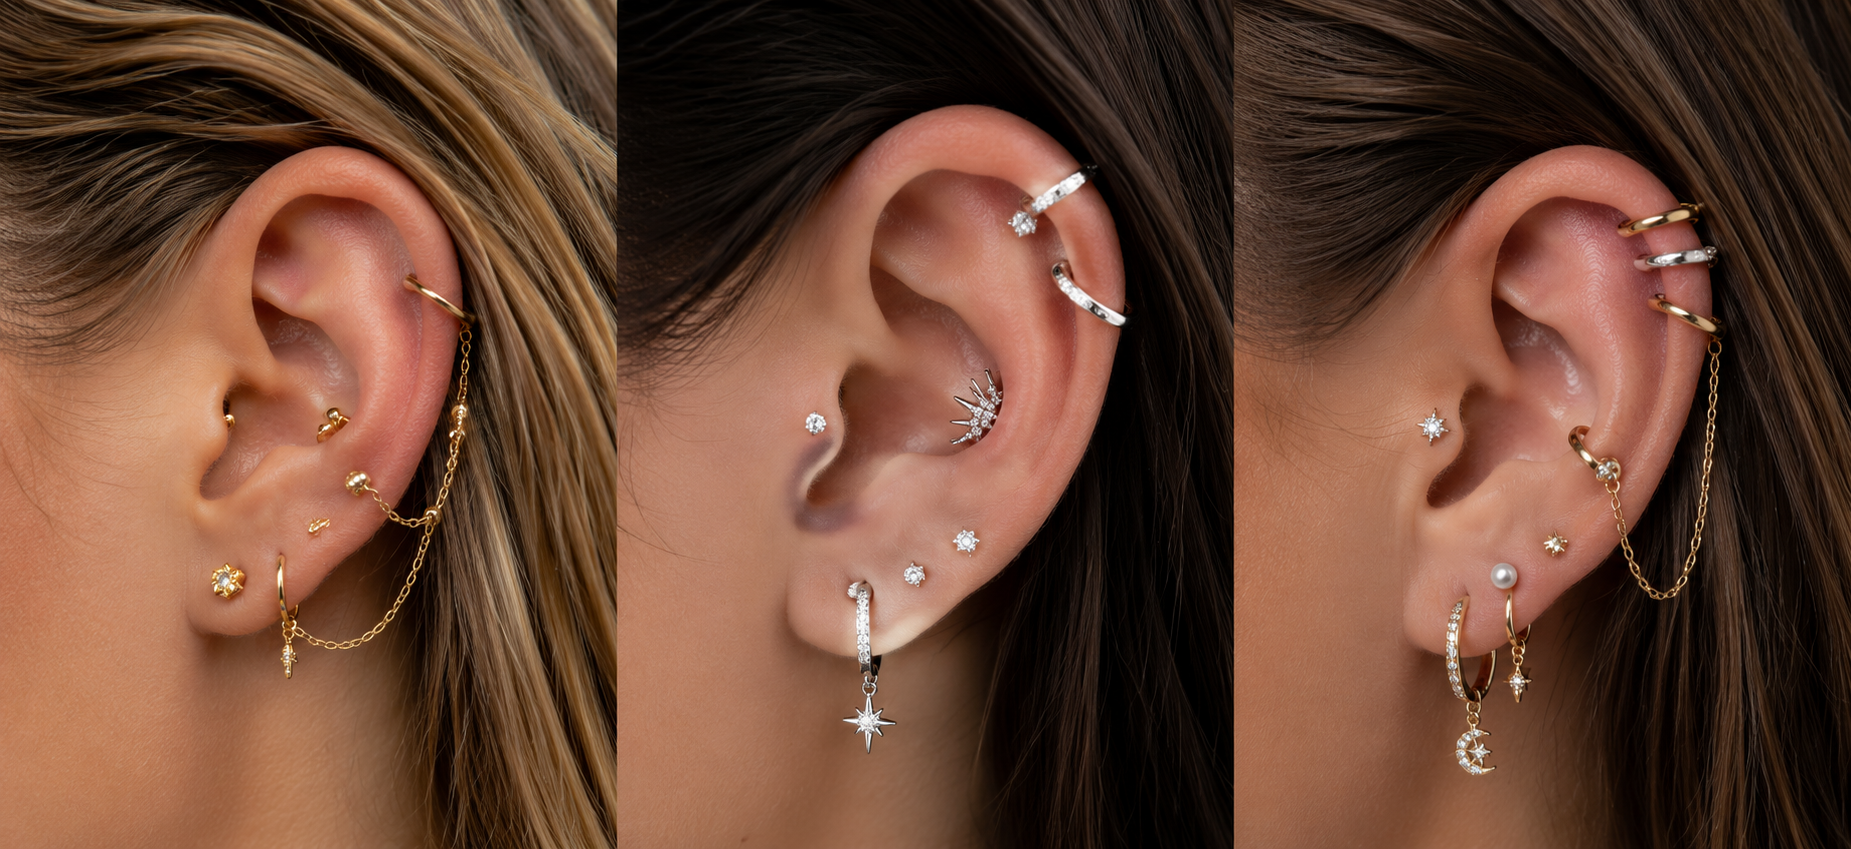
The Different Types
This is where most guides get generic. There are genuinely distinct placements, and each one changes the look considerably.
Standard helix. The most common. A single piercing through the upper outer cartilage rim, typically placed in the upper third of the ear. It’s the starting point for most people and the one that works as a standalone or as the foundation of a stack.
Double helix. Two piercings stacked vertically along the outer rim. They can be placed close together for a tight cluster effect or spaced further apart for a more intentional, spread-out look. Most people do these in the same session with an experienced piercer, though some space them out to let the first heal properly before adding the second.
Triple helix. Three piercings along the same ridge. At this point you’re building a full ear story along the outer cartilage. It reads as a considered, curated statement. The spacing matters a lot here – too tight and the pieces compete with each other, too spread out and it loses the sense of connection.
Forward helix. This one is different in placement and feel. The forward helix sits at the front of the ear, right where the outer cartilage meets the face – the small folded section just above the tragus. It’s less visible from the front and more visible from the side, which gives it a subtle, interesting quality that the standard helix doesn’t have. Anatomy-dependent – not every ear has enough cartilage in this area to accommodate it comfortably.
Hidden helix. Placed on the inner curve of the helix rather than the outer rim. When jeweled with a small flat stud, it catches light in a way that looks almost like the ear itself is decorated. Quieter than the standard helix, more of a discovery than a statement.
Low helix. Sits just above the earlobe, in the lower section of the cartilage ridge. Works particularly well as a transition point between lobe piercings and cartilage piercings, blending the two zones into one seamless stack.
According to Urban Body Jewelry’s comprehensive helix piercing guide, the helix ranges from just above the earlobe to the very top of the ear – meaning you can technically get pierced anywhere along that outer ridge depending on your anatomy and what look you’re going for. The anatomy-depending caveat is real. A good piercer will assess your ear before marking placement, not just point to a spot on a chart.
How Much It Hurts
Honestly? Less than most people expect in the moment. More than they expected in the days after.
The actual piercing is quick. Cartilage is denser than lobe tissue, so there’s more resistance and a sharper sensation when the needle passes through – but it’s over in a second. Most people rate the pain around 4 to 6 out of 10. It’s a brief, sharp pressure rather than a prolonged sting.
What catches people off guard is the soreness that follows. For the first few days, the piercing is tender, warm, and slightly swollen. Sleeping on it accidentally hurts. Catching it on hair hurts. Bumping it with headphones hurts. None of this is alarming – it’s the normal inflammatory response to cartilage being pierced. But it’s worth knowing that the piercing experience isn’t just the thirty seconds in the chair.
One thing worth saying clearly: never use a piercing gun for a helix piercing. Ever. Piercing guns force jewelry through cartilage using blunt pressure rather than a clean needle cut. That blunt trauma can shatter cartilage, cause permanent scarring, and create healing complications that a needle piercing simply doesn’t. It’s not a matter of personal preference – it’s a structural issue with what a gun does to dense tissue. Any reputable piercing studio uses a needle. If they offer a gun for cartilage, leave.
Healing Time – The Real Timeline
This is the part most people underestimate.
A helix piercing takes between 6 and 12 months to fully heal. Some ears take the full year. Cartilage has significantly less blood supply than soft tissue, which is why it heals slowly – the tissue is rebuilding without the same circulation that speeds up lobe healing.
The tricky part is that a helix piercing can look and feel healed long before it actually is. The outer skin closes over within a few months. The inner tissue takes longer to stabilize. Changing jewelry at three months because it looks fine is one of the most common ways people set their healing back significantly.
Vital Piercing’s helix guide breaks it down clearly – weeks one and two involve swelling, redness, and warmth, which are all normal inflammatory responses. Weeks three through twelve, the swelling reduces and new tissue forms around the jewelry. The piercing looks healed from the outside but is still fragile inside. This is the stage where most people make the mistake of changing jewelry too early or getting lazy with aftercare.
The rule from the Association of Professional Piercers is to wait until your piercer confirms it’s healed before changing jewelry. Not when it looks healed. When it actually is.
Aftercare – What Actually Works
The good news is that helix aftercare is simple. The discipline is in doing it consistently for the full healing period, not just the first few weeks when motivation is high.
Clean twice daily with sterile 0.9% saline solution – a wound wash spray is the easiest format. Spray it on, let it sit for thirty seconds, then pat dry gently with a non-woven gauze pad or clean paper towel. In the shower, let warm water run over it naturally to loosen any crusting without scrubbing.
Sleep on the opposite side. If you’re a side sleeper, a travel pillow with a hole in the center is a genuinely useful investment – it lets you sleep without any pressure on the ear. Change your pillowcase regularly. The amount of bacteria that accumulates in bedding and then rests against an open healing wound for eight hours a night is worth taking seriously.
Keep hair tied back, especially in the first few weeks. Shampoo, conditioner, dry shampoo – all of it can irritate a healing cartilage piercing when it gets into the wound. Rinse thoroughly in the shower and don’t let hair products sit near the piercing.
What not to do: don’t twist or rotate the jewelry. This is old advice that persists despite being counterproductive – rotating the jewelry disrupts the healing tissue forming around the piercing and can cause irritation bumps. Leave it alone. Don’t touch it with unwashed hands. Don’t submerge it in swimming pools, hot tubs, or open water during healing.
Irritation bumps are the most common complication – small raised bumps that form around the piercing, usually from sleeping on it, snagging it, or cleaning with harsh products. They’re not keloids, which are genetic and much rarer. Most irritation bumps resolve on their own once you remove whatever is causing the irritation.
Jewelry – What to Wear and When
Your piercer will start you with a flatback labret stud – a straight post with a flat disc back that sits flush against the inside of the ear. This is the standard initial jewelry for helix piercings because it doesn’t move, doesn’t snag, and allows room for swelling without pressure. Most initial piercings are done in 16 or 18 gauge.
Don’t request a hoop as your initial jewelry even if you want that look long-term. Hoops move with every shift of the head and create friction against healing tissue. Starting with a flatback stud and transitioning to a hoop after full healing is the right sequence.
For materials, implant-grade titanium is the gold standard – lightweight, hypoallergenic, and available in anodized colors. Solid 14k or 18k gold is an excellent option if titanium isn’t available. Avoid surgical steel if you have nickel sensitivity, as some surgical steel alloys contain nickel. Sterling silver is fine for healed piercings but too porous for healing tissue.
Once fully healed, the options open up considerably. Hoops and clicker rings are the most popular long-term choice – a thin hoop through a helix has a clean, timeless quality that works with everything. If you’re also building out the rest of your beauty routine while you wait for the healing process to finish, our guide to non-toxic lipstick covers the ingredient labels worth reading before your next makeup purchase.
Cost
Expect to spend between $40 and $80 for a single helix piercing at a reputable studio, including the initial jewelry. Some studios price the piercer’s fee and the jewelry separately. The jewelry choice significantly affects the total – a basic titanium flatback costs less than a solid gold piece with a stone.
The single most important factor in cost is not the price. It’s the piercer’s experience with cartilage piercings specifically and the studio’s sterilization standards. A piercing done with poor technique or unsterile tools will cost you significantly more in complications and corrective care than any upfront savings justify.
Check for studios that are members of the Association of Professional Piercers – a good signal of training standards and safety protocols.
Building an Ear Stack
The helix is one of the most popular starting points for a curated ear – the deliberate, considered collection of piercings across different ear placements that has become one of the defining jewelry trends of the past decade.
A classic starting stack: lobe piercing at the base, a second lobe above it, a low helix or standard helix above that. Each addition builds the story upward. Mixed metals, varied stone sizes, alternating studs and small hoops – all of it works together when the placements are considered and the pieces are scaled appropriately to the ear.
If you’re building toward a stack, plan your placements with a piercer before committing to any single one. The geography of your ear determines what’s possible and what will look balanced. A good piercer will look at your full ear anatomy and suggest a sequencing plan rather than just doing one piercing at a time in isolation. For more beauty and style content covering everything from skincare to jewelry to everyday looks, the full beauty category has you covered.
Small things. Big flavor.
FAQs
How painful is a helix piercing?
Most people rate helix piercing pain at 4 to 6 out of 10. The piercing itself is brief – a sharp pressure as the needle passes through cartilage. The more significant discomfort comes in the days after, when the area is tender, warm, and sensitive to contact.
How long does a helix piercing take to heal?
Between 6 and 12 months for full healing. The outer skin may appear healed within a few months, but the inner cartilage tissue takes significantly longer to stabilize. Changing jewelry before the piercing is fully healed is the most common cause of setbacks.
Can I sleep on a helix piercing?
Not during healing. Sleeping on a healing helix piercing puts sustained pressure on the wound and is one of the main causes of irritation bumps. A travel pillow with a cutout section allows side sleepers to rest without pressure on the ear.
What is the difference between a helix and a forward helix piercing?
A standard helix piercing goes through the outer rim of the upper ear. A forward helix is placed at the front of the ear where the outer cartilage meets the face, just above the tragus. The forward helix is more visible from the side and has a subtler, more architectural quality.
When can I change my helix piercing to a hoop?
Wait until your piercer confirms the piercing is fully healed – typically a minimum of 6 months, often longer. Switching to a hoop too early introduces movement against healing tissue and can significantly delay the process.
What jewelry is best for a helix piercing?
Implant-grade titanium or solid 14k gold for initial and long-term wear. Start with a flatback labret stud in 16 or 18 gauge. Avoid sterling silver during healing, and never use a piercing gun for cartilage piercings.
What is an irritation bump on a helix piercing?
A small raised bump that forms around the piercing, usually caused by pressure, snagging, or harsh cleaning products. Irritation bumps are common and different from keloids – they typically resolve once the source of irritation is removed.
How much does a helix piercing cost?
Between $40 and $80 at a reputable studio, including initial jewelry. Studios with experienced cartilage piercers and strong sterilization standards are worth the investment regardless of where that falls in the price range.