The Best Fluffy Pancakes recipe you will fall in love with. Full of tips and tricks to help you make the best pancakes.
There’s a smell that takes over the kitchen when granola is baking. Warm oats, toasted nuts, something sweet catching the edge of the heat. It’s one of those smells that makes people wander in from other rooms and ask what you’re making.
And when you tell them it’s just granola, they always seem a little surprised. Like it should have been harder to produce something that smells that good.
The truth is, homemade granola is one of the easiest things you can make from scratch. A bowl, a baking sheet, about ten minutes of actual effort, and thirty minutes in the oven. That’s it. No special equipment. No culinary skills required. Just pantry basics and a little patience while it cools.
Once you make your own, the store-bought kind starts to feel like a compromise. Too sweet, too expensive, full of ingredients you’d need a dictionary to understand. A good homemade granola recipe gives you control over all of that – and the result is something you’ll actually want to eat every morning instead of staring at and feeling guilty about.
If you’ve been looking for the best homemade granola recipe to actually stick with, this is the one.
What Is Granola, Actually?
It sounds like an obvious question, but it’s worth understanding what you’re working with before you start making it.
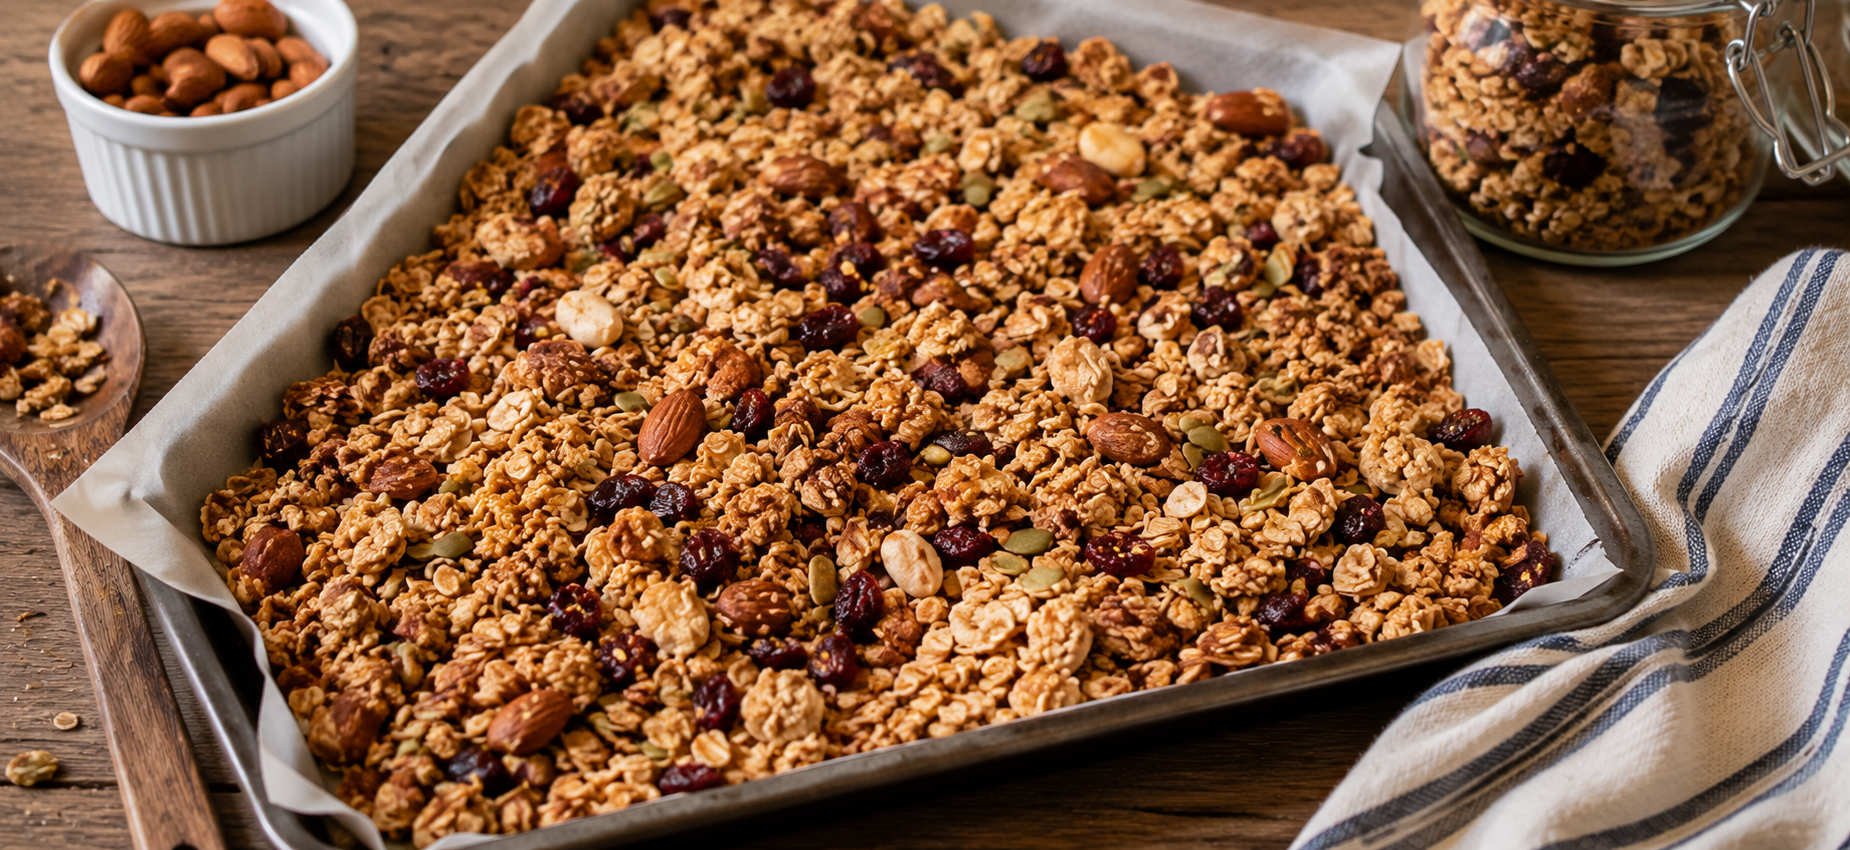
Granola is essentially rolled oats mixed with a fat, a sweetener, and whatever add-ins you want, then baked at low heat until everything turns golden and crunchy. The fat helps the oats toast evenly. The sweetener caramelizes during baking and binds everything into those satisfying clusters.
What’s in granola beyond that is really up to you – nuts, seeds, dried fruit, coconut flakes, spices, chocolate chips after baking. That flexibility is part of what makes DIY granola so worth doing. You’re not locked into whatever a brand decided to put in the bag.
Most commercial granola is loaded with added sugar, processed oils, and sometimes so much sweetener that it crosses into dessert territory while pretending to be a healthy breakfast. According to research on breakfast cereals, many packaged granolas contain as much sugar per serving as a cookie. That’s not a knock on the product – it’s just a reason to make your own.
Homemade granola is healthy in a way the store-bought version often isn’t, because you decide what goes in.
Why Homemade Granola Is Worth Making
There are a lot of foods where homemade is genuinely better but also genuinely harder. Granola is not one of those foods.
Making granola at home takes less time than driving to the store and finding a bag that doesn’t have palm oil or high-fructose corn syrup hiding in the fine print. It costs less per serving. It keeps for weeks in an airtight container. And the flavor is in a completely different category from anything pre-packaged.
The other thing about healthy homemade granola is that it’s actually customizable in a way that matters. Have a nut allergy? Leave the nuts out. Don’t like dried fruit? Skip it. Want more protein? Add pumpkin seeds and hemp hearts. Want it less sweet? Reduce the maple syrup by a tablespoon. The recipe bends to you rather than the other way around.
Once you learn how to make granola at home, you’ll find yourself adjusting the recipe every couple of batches – adding something new, switching out the sweetener, trying a different spice. That’s what cooking from scratch actually feels like when the recipe is simple enough to understand.
What Is Granola Made Of? The Core Ingredients
Here’s what goes into a good healthy granola recipe. These are the essentials – everything else is optional.
Rolled oats – Old-fashioned rolled oats, not instant. Instant oats are too thin and will turn to mush. Rolled oats give you that chewy, hearty texture that makes granola worth eating. They’re also the base of everything, so use a good one.
A fat – Coconut oil is the most common choice for homemade granola recipes and for good reason. It has a high smoke point, a mild flavor, and it helps everything crisp up evenly. Olive oil works too and gives a slightly more savory, complex result. Butter is another option if you prefer a richer, more classic flavor.
A sweetener – Pure maple syrup is the gold standard. It caramelizes beautifully, adds depth without being cloying, and produces better clusters than most other sweeteners. Honey works similarly but can sometimes make the granola chewier rather than crunchy. Brown sugar is a simpler option if that’s what you have.
Salt – Don’t skip it. Salt is what makes sweet things taste like themselves instead of just sugary. A good pinch of flaky salt on top before baking makes the whole batch taste better.
Spices – Cinnamon is the classic, and it works well for a reason. Vanilla extract, cardamom, and nutmeg all layer in nicely too.
That’s the foundation. Everything after this is your call.
The Best Homemade Granola Recipe
This recipe is straightforward, endlessly adjustable, and produces granola that actually clusters. That last part is worth mentioning because it’s what separates a good granola recipe from a great one.
Makes: About 4 cups Time: 10 minutes prep, 30-35 minutes baking
Ingredients
- 3 cups rolled oats (old-fashioned, not instant)
- 1/3 cup coconut oil, melted
- 1/3 cup pure maple syrup
- 1 teaspoon vanilla extract
- 1 teaspoon ground cinnamon
- 1/2 teaspoon fine salt
- 1 cup mixed nuts, roughly chopped (almonds, pecans, walnuts – your choice)
- 1/2 cup seeds (pumpkin seeds, sunflower seeds, or a mix)
- 1/2 cup dried fruit, added after baking (raisins, cranberries, chopped apricots)
Method
Step 1: Preheat and prep Heat your oven to 325°F (165°C). Line a large baking sheet with parchment paper. This is worth doing properly – granola sticks to unlined pans and the caramelized sweetener can be genuinely difficult to clean off.
Step 2: Mix the wet ingredients In a large bowl, whisk together the melted coconut oil, maple syrup, vanilla, cinnamon, and salt. It should look like a loose, fragrant syrup.
Step 3: Add the dry ingredients Add the oats, nuts, and seeds to the bowl. Stir everything together until the oats are fully coated. Take your time here – you want every oat to get a coating of the wet mixture, because that’s what creates the golden color and the crunch.
Step 4: Spread and press Spread the mixture across your lined baking sheet in an even layer. Then press it down firmly with a spatula or the back of a spoon. The pressing is the key step that most recipes forget to mention. Pressing the mixture flat and compact is what creates clusters when it bakes. If you spread it loosely, you get loose granola. Pressed flat, you get satisfying chunks.
Step 5: Bake without stirring This is the other step people get wrong. Bake at 325°F for 30-35 minutes without stirring. Yes, without stirring. Stirring breaks the clusters before they’ve had a chance to set. Check the edges at the 25-minute mark – they’ll brown faster than the center. The granola is ready when the edges are deep golden and the center looks set and dry.
Step 6: Cool completely before breaking Remove from the oven and let the granola cool on the pan for at least 20 minutes before touching it. It will feel soft right out of the oven. That’s normal. It crisps up as it cools. Breaking it too early = no clusters.
Once cool, break into pieces and stir in your dried fruit.
The Secrets to Crunchy, Clustery Granola
Making granola is simple. Making granola that actually has those big satisfying clusters people pay extra for at specialty stores requires a few small things done right.
Press it firmly before baking. This is the biggest cluster-making move. The more you compact the mixture on the baking sheet, the more the pieces stick together during baking.
Don’t stir it. Let it bake undisturbed. Every time you stir, you break the bonds forming between pieces. The only exception is if you notice the edges burning significantly faster than the center – then rotate the pan, don’t stir.
Low and slow. 325°F rather than a higher temperature gives everything time to toast evenly without burning the sweetener. Higher heat will brown the outside before the inside crisps up.
Cool on the pan. The granola finishes cooking and sets its crunch as it cools. Moving it too soon interrupts that process.
Don’t skip the fat. The fat is what creates crunch. Recipes that go very low on oil produce granola that’s chewy rather than crispy. If you want crunchy, you need the fat.
Add dried fruit after baking. Dried fruit baked into granola turns tough, overly sweet, and sometimes burnt. Always stir it in after the granola has cooled.
Is Homemade Granola Healthy?
This question comes up a lot and the honest answer is: it depends entirely on what you put in it and how much of it you eat.
The ingredients in a simple homemade granola recipe – oats, nuts, seeds, a modest amount of maple syrup or honey, a fat – are all genuinely nutritious. Oats are one of the most nutrient-dense whole grains available, high in fiber, complex carbohydrates, and a range of vitamins and minerals. Nuts and seeds add healthy fats, protein, and micronutrients. Even a tablespoon of coconut oil or olive oil is doing useful work here.
Where granola tips from healthy into heavy is in portion size and sweetener amounts. A quarter cup serving is the standard, which looks smaller than most people’s bowls. It’s easy to eat two or three servings without noticing.
Healthy homemade granola is also significantly better for you than the packaged kind because you control the sugar level. A typical store-bought granola can have 12-15 grams of added sugar per serving. A DIY granola recipe made with 1/3 cup of maple syrup spread across 8 servings has about 8-9 grams per serving – and you can reduce that further if you prefer.
So yes, homemade healthy granola is a genuinely good breakfast option. Just eat it with real portions in mind.
How to Store Homemade Granola
Good news: granola keeps really well, which makes it ideal for meal prepping.
Store your cooled granola in an airtight container at room temperature. A glass jar with a lid, a sealed tin, or a zip-lock bag all work. Kept this way, it stays crunchy and fresh for up to three weeks.
For longer storage, granola freezes well. Spread it in a freezer bag, press out the air, and it’ll keep for up to three months. Let it come to room temperature before eating – it defrosts quickly and doesn’t need any reheating.
Avoid storing it in the refrigerator. The moisture in a fridge can soften the oats and make it go stale faster than just leaving it in a sealed container at room temperature.
Variations Worth Trying
Once you have the base recipe down, it’s worth experimenting. This is one of those recipes where changing one or two things completely changes the character of the result.
Chocolate granola – Stir two tablespoons of cocoa powder into the wet mixture before coating the oats. Add dark chocolate chips after baking once the granola has fully cooled.
Tropical granola – Use macadamia nuts and cashews, swap the cinnamon for a pinch of cardamom, and stir in diced dried mango and toasted coconut flakes after baking.
Peanut butter granola – Replace two tablespoons of the coconut oil with natural peanut butter, warmed slightly so it mixes easily. The result tastes like a granola bar in loose form.
Savory granola – Skip the maple syrup and vanilla. Use olive oil instead of coconut oil, add cumin, smoked paprika, and cayenne, and toss in pumpkin seeds and sunflower seeds. Serve over salads or soup instead of with milk. It sounds unusual but it’s worth trying once.
Nut-free granola – Simply replace the nuts with more seeds – sunflower, pumpkin, hemp, sesame. You still get crunch and protein without any of the common allergens.
Ways to Eat Homemade Granola
The obvious answer is with milk or yogurt and some fruit. That’s the classic for good reason. But granola is more versatile than most people use it.
It works as a topping for smoothie bowls, adding crunch and substance to what would otherwise be just a thick drink. A small handful over plain Greek yogurt with a drizzle of honey is one of the best fast breakfasts going. It’s also good on top of baked fruit – roasted peaches, warm poached pears, or baked apples with a scoop of granola sitting on top.
Some people eat it straight as a snack, which is completely valid. A small handful is satisfying in the way trail mix is satisfying – it’s got enough fat and carbohydrate to actually hold you for a while.
If you enjoy making from-scratch breakfast staples, our cooking section has a range of recipes worth exploring – from simple weeknight ideas to the kind of weekend projects that make the kitchen smell incredible.
Frequently Asked Questions
What is granola made of?
At its core, granola is rolled oats mixed with a fat (like coconut oil or butter), a sweetener (like maple syrup or honey), and then baked until golden and crunchy. Most recipes also include nuts, seeds, spices, and dried fruit. That’s the whole thing – no mystery ingredients required.
Is homemade granola healthy?
Yes, when made with simple ingredients and eaten in reasonable portions. Homemade granola lets you control the sugar level, the type of fat, and what goes in. It’s nutritionally much cleaner than most packaged versions, which often contain high amounts of added sugar and processed oils.
Why isn’t my granola crunchy?
Usually one of three reasons: the oven temperature was too high and the outside browned before the inside dried out, it was stirred during baking which breaks up the clusters before they set, or it wasn’t allowed to cool fully on the pan before being moved. All three are easy fixes once you know what causes them.
How do I get big clusters in my granola?
Press the mixture firmly onto the baking sheet before it goes in the oven, and don’t stir it during baking. Let it cool completely on the pan before breaking it up. Those three steps are what separate cluster granola from loose granola.
Can I make granola without oil?
You can, but the result will be much chewier and less crunchy than an oil-based recipe. Fat is what creates the crispiness as the oats bake. If you want to reduce the fat, try cutting it by half rather than eliminating it entirely – you’ll still get some crunch without as many calories.
How long does homemade granola last?
Stored in an airtight container at room temperature, up to three weeks. Frozen in a sealed bag, up to three months. Avoid the refrigerator – the moisture tends to soften the oats and make it go stale faster.
Can I use quick oats instead of rolled oats?
Technically yes, but the texture will be quite different – softer and less hearty. Old-fashioned rolled oats are the right choice for granola because they hold their shape during baking and give you that satisfying chew. Instant oats will cook too quickly and produce a powdery, thin result.
What sweetener works best for homemade granola?
Pure maple syrup produces the best clusters and the most balanced flavor. Honey works nearly as well but can make the granola slightly chewier. Brown sugar is a budget-friendly option but doesn’t create clusters as reliably. Agave syrup works but tends to produce a flatter flavor than maple or honey.
Can I add protein powder to granola?
Yes. Stir one or two tablespoons of unflavored or vanilla protein powder into the dry mixture before coating with the wet ingredients. It can slightly affect the texture, making it a touch drier, so you may want to add an extra teaspoon of oil to compensate.
Looking for more recipes worth making from scratch? Explore the cooking category at Masago – from simple weeknight meals to the kind of weekend projects that are worth every minute.